A lot more goes into a design than what meets the eye. We see designers and architects in the media with their impressive skyscraper models and on construction sites pointing at… well ... something. But what really goes into a design? It all starts with an idea or thought. As architects, it is our solemn duty to take an idea and turn it into a reality. And while we love doing it, it comes with its own set of challenges. One such example: our Interactive Coat Hook design.
It all started when we were approached to invent, design, and build a new coat hook system for Eaglebrook School. It is not often that someone thinks to ask the architect for a solution to such a problem (after all, aren’t we busy building models of expensive skyscrapers?) But architects are known for "doing it all" – from buildings to furniture – as large as a city plan and as detailed as a cabinet knob, we design at every scale.
And there were many other things to consider: In a school of (presumably messy) middle school age boys, the coat hooks need to be something the students will actually want to use, something more appealing than the convenience of throwing a coat on the floor. It also needs to be sturdy. Nothing says “climb me” quite like a bunch of pegs sticking out of the wall. And what about roughhousing? No one likes the idea of playful students being impaled on coat hooks. To see the full concept, check out our previous post: Windigo Presents: Furniture Design
The process began with sketching out as many ideas as possible. The coat hooks had to be fun, so students would want to use it; movable, flexible, so no one would get hurt on it; sturdy, so no one would break it; easy to assemble, so many more could be made; unique, so no one else would have one; yet quiet, so it would not detract from the adjacent students’ artwork. It soon became apparent that these were not going to be your grandmother’s coat hooks…
We then approached the design development phase. Sketches are essential, but a 3D model would allow us to bring the project to a different level and truly understand it as a functioning object as well as addressing design issues. How far off the wall would the hooks hang so that when turned, they don’t hit the wall? How does one actually go about activating them? What is the mechanism? What is the optimal angle, size, and material for hanging objects? In addition to scale drawings, and 3D models, we also built full scale mock ups to test our theories and present to the client. (okay, so architects do build fancy models...)
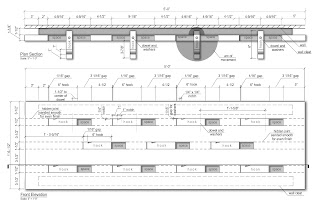
After finally reaching a definite design, the next question was a bit obvious: Now how on earth is this to actually be constructed? Now this is where we get into the real details. Every single inch of the coat hook needed to be designed and detailed so that anyone could build one. Like a recipe, or set of Lego instructions, the construction documents need to be meticulous, specific, and easy to understand.
With the help of furniture maker Robert Brander, we were able to construct our idea into an tactile product:
We’ve recently installed the new system into the school's Learning Center. Now is the moment of truth – will they succeed? Will students use them? Only time will tell out how our concept will fair in the real world... (Although we have to say: We're pretty confident it will)


No comments:
Post a Comment